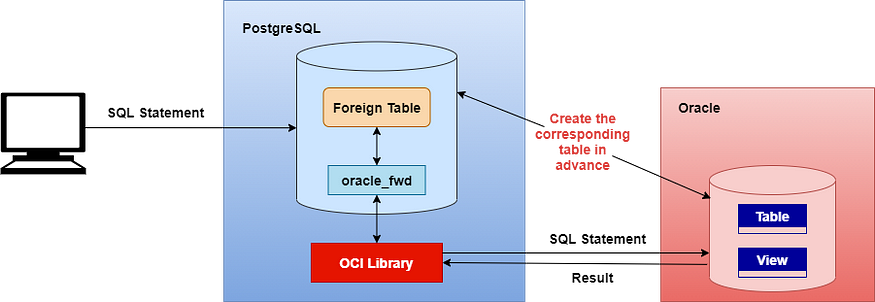
oracle_fdw 내용 정리
- postgresql extension으로 oracle 소스 데이터베이스에 접근해 Foreign Data Wrapper를 제공함.
- 타겟에서 foreign table을 만들어 테이블처럼 사용함.
- github url : https://github.com/laurenz/oracle_fdw
GitHub - laurenz/oracle_fdw: PostgreSQL Foreign Data Wrapper for Oracle
PostgreSQL Foreign Data Wrapper for Oracle. Contribute to laurenz/oracle_fdw development by creating an account on GitHub.
github.com

[환경정보]
- 소스
- OS : RHEL 7.3
- DBMS : Oracle Database 12c Enterprise Edition Release 12.2.0.1.0
- 타겟
- OS : Rocky 8 .10
- DBMS : PostgreSQL 14.9 (rpm 설치)
[설치 파일 정보]
- Oracle Instant Client for Linux x86-64 (64-bit) 다운로드
- url : https://www.oracle.com/database/technologies/instant-client/linux-x86-64-downloads.html
- 필요파일 : instantclient-sdk-linux.x64-12.2.0.1.0.zip, instantclient-basic-linux.x64-12.2.0.1.0.zip
- oracle_fdw-ORACLE_FDW_2_6_0.tar 다운로드 (최신버전 확인)
- url : https://github.com/laurenz/oracle_fdw/releases/tag/ORACLE_FDW_2_6_0
- 제약조건 확인 : Major별 오래된 minor 버전들을 지원 안함
[설치진행]
- `oracle_fdw`은 make & make install로 설치가능함.
- 타겟 postgresql이 yum install 되어서 빌드를 위해 postgresql-xx-devel 패키지 설치가 필요함
1. 설치파일 준비
- instantclient-sdk-linux.x64-12.2.0.1.0.zip
- instantclient-basic-linux.x64-12.2.0.1.0.zip
- oracle_fdw-ORACLE_FDW_2_6_0.tar
# symbolic link 생성
$ cd instantclient_12_2
$ ln -s libclntsh.so. libclntsh.so
2. postgresql-xx-devel rpm 설치
root@test01:/root> rpm -qa |grep postgres
postgresql14-libs-14.9-2PGDG.rhel8.x86_64
postgresql14-server-14.9-2PGDG.rhel8.x86_64
postgresql14-14.9-2PGDG.rhel8.x86_64

#설치된 devel 패키지가 없으므로 rpm 다운받고 옮겨서 수동 설치 진행

#(url : https://download.postgresql.org/pub/repos/yum/common/redhat/rhel-8-x86_64/)
$ yum localinstall postgresql14-devel-14.9-2PGDG.rhel8.x86_64.rpm
3. 환경변수 수정
su - postgres

vi .bash_profile
## oracle_fdw environments
export ORACLE_HOME=/home/test01/pg/14/extensions/instantclient_12_2
export TNS_ADMIN=/home/test01/pg/14/extensions/instantclient_12_2
export LD_LIBRARY_PATH=${ORACLE_HOME}:$LD_LIBRARY_PATH:/usr/lib64
4. oracle_fdw 빌드진행
$ cd oracle_fdw-ORACLE_FDW_2_6_0

[postgres@test01 oracle_fdw-ORACLE_FDW_2_6_0]$ make
[postgres@test01 oracle_fdw-ORACLE_FDW_2_6_0]$ make install
5. extension 생성 및 초기 셋팅
postgres=# create extension oracle_fdw;

postgres=# select * from pg_extension;

oid | extname | extowner | extnamespace | extrelocatable | extversion | extconfig | extcondition

-------+--------------------+----------+--------------+----------------+------------+---------------+--------------

14470 | plpgsql | 10 | 11 | f | 1.0 | |

35227 | pg_stat_statements | 16385 | 16386 | t | 1.9 | |

36969 | vector | 16385 | 16386 | t | 0.7.0 | |

93897 | dblink | 10 | 2200 | t | 1.2 | |

94609 | oracle_fdw | 10 | 2200 | t | 1.2 | |

(8 rows)
# 서버 생성
postgres=# CREATE SERVER test_fdwserver FOREIGN DATA WRAPPER oracle_fdw OPTIONS (dbserver '(DESCRIPTION=(ADDRESS=(PROTOCOL=TCP)(Host=1.1.1.1)(Port=1521))(CONNECT_DATA=(SID=TEST_SID)))');
# 유저 매핑
CREATE USER MAPPING FOR username SERVER test_fdwserver OPTIONS (user 'target user name', password 'target user password');
서버생성 및 유저 매핑을 사전에 해두면, dblink 사용 시 마다 비밀번호 노출이 되는 것을 피할 수 있다.
기타. Dictionary table
Forigen 테이블 생성 방법
CREATE FOREIGN TABLE [스키마명].[테이블명](
col1 NUMERIC
, col2 VARCHAR(10)
) SERVER [서버명] OPTIONS (SCHEMA '[타겟스키마명]', TABLE '[타겟테이블명]');(타겟-postgresql)

postgres=# CREATE FOREIGN TABLE postgres.dblink_test(
col1 NUMERIC
, col2 VARCHAR(10)
) SERVER test_fdwserver OPTIONS (SCHEMA 'TEST_SID', TABLE 'DBLINK_TEST');

postgres=# select * from postgres.dblink_test;
col1 | col2
------+------
1 | test
(1 row)
oracle_fdw 예시
(소스-oracle)
create table TEST_SID.dblink_test
(
col1 number,
col2 varchar2(10)
);
insert into test_sid.dblink_test values(1,'test');
commit;

(타겟-postgresql)
위 참고
이슈
- LD_LIBRARY_PATH 인식을 못해서 /usr/lib64로 oracle lib들을 symbolic link 해주었으나, 결국 연동 에러 발생해 재기동 하였음.
- 만약 여러 postgresql 인스턴스가 설치되어있다면, pgxs가 올바른 path 잡혀있는지 확인 `$ pg_config --pgxs`

'Life > CS' 카테고리의 다른 글
| [SQL 문제풀이] SQL 코딩 테스트 연습 사이트 추천 (1) | 2024.07.09 |
|---|---|
| [리눅스] tar 명령어 알아보기, tar 압축하기, 압축해제 (0) | 2024.07.05 |
| [PostgreSQL] log파일 스위칭 방법 pg_ctl logrotate (0) | 2024.05.31 |
| [LINUX] 서버 간 방화벽 포트 열려있는지 확인하기 - telnet, curl, nc (0) | 2024.05.31 |
| [PostgreSQL] Tibero to PostgreSQL 개별 테이블 이관하기 (pandas 사용) (0) | 2024.05.18 |


댓글